Introduction to Cast Iron Apple Crisp
As the leaves change and a crispness fills the air, there’s nothing quite like the aroma of a cast iron apple crisp wafting from your oven. This classic dessert is not just a treat for your taste buds; it’s a beautifully rustic way to celebrate the flavors of fall. Picture this: warm apples, spiced with cinnamon and perhaps a hint of nutmeg, topped with a deliciously crumbly oat mixture, all baked to bubbly perfection in a trusty cast iron skillet.
Why cast iron apple crisp is the ultimate fall dessert
So, what makes a cast iron apple crisp the quintessential fall dessert? For starters, the cast iron skillet ensures an even cooking temperature, allowing the apples to soften while the topping gets that perfect golden, crunchy finish. Unlike traditional baking dishes, cast iron retains heat exceptionally well, creating that irresistible crisp texture that keeps you coming back for seconds.
Quick and Easy
Making apple crisp is a breeze. Just slice your apples, mix in some sugar and spices, and top it with your favorite oat mixture. You can easily whip it up on a busy weeknight or showcase it at a festive gathering. The best part? You can prepare it ahead of time and pop it in the oven when guests arrive. For more tips on prepping desserts in advance, check out resources from The Kitchn.
Healthier Indulgence
If you’re concerned about health, a cast iron apple crisp might just be your perfect match. Apples are high in fiber and packed with vitamins. Combine that with oats, and you’ve got a dessert that feels indulgent without the guilt. Plus, you can substitute butter with coconut oil or even applesauce to lighten the recipe without sacrificing flavor.
A Personalized Touch
Because the apple crisp is so customizable, you can swap in different fruits, nuts, or spices according to your preferences. Want a beef twist? Try adding a scoop of Turkey Bacon for a sweet-and-savory combination.
In short, making a cast iron apple crisp is a delightful way to embrace the season and bring a warm, homey feeling to your table. With every bite, you’re not just enjoying dessert; you’re savoring memories, nostalgia, and perhaps a few moments of culinary creativity along the way. So, are you ready to roll up your sleeves and dive into this delicious fall tradition?
Ingredients for Cast Iron Apple Crisp
Creating a delicious cast iron apple crisp is all about selecting the right ingredients that complement each other perfectly. Let’s break it down into two essential sections: the filling and the topping.
Essential ingredients for the filling
For the filling, you’ll want to focus on aromatic and flavorful apples that can hold their shape while baking:
- Tart apples like Granny Smith or Honeycrisp for a perfect balance of sweetness and acidity.
- Sugar to enhance the natural sweetness of the apples; brown sugar can add a lovely caramel flavor.
- Cinnamon for that warm, comforting spice note. A pinch of nutmeg is also a lovely addition.
- Lemon juice to brighten the flavors and keep the apples from browning.
Feel free to explore different kinds of apples for variations! Check out this guide on Choosing the Best Apples for baking.
Topping ingredients that make it crunchy
Now, let’s talk about the topping, the star of your cast iron apple crisp:
- Rolled oats give a hearty texture and a chewy bite.
- Flour to help bind the topping together; all-purpose works great.
- Butter (or a substitute if you prefer) for that rich flavor. Make sure it’s cold for a crumbly topping!
- Brown sugar again to add depth and sweetness, and a pinch of salt to balance out the flavors.
Combine these ingredients to create a delightful crunch that perfectly contrasts with the soft apples below. For more tips on creating the perfect topping, check out Baking Tips.
There you have it! By carefully selecting these ingredients, you’re well on your way to a delightful cast iron apple crisp that will impress your friends and family.
Preparing Cast Iron Apple Crisp
If you’re craving a warm, comforting dessert that hugs your soul, nothing beats a delightful cast iron apple crisp. This simple, yet scrumptious dish is perfect for gatherings or a cozy night in. Plus, making it in a cast-iron skillet adds that touch of rustic charm, not to mention the fantastic even heating it provides. Let’s walk through the process step by step for a delicious outcome.
Step 1: Preheat and Prepare Your Skillet
Start by preheating your oven to 350°F (175°C). This step is crucial because you want your apple crisp to bake evenly and become perfectly golden. While the oven warms up, grab your cast-iron skillet and give it a good wash if needed. Make sure it’s dry, then lightly grease the bottom with butter or cooking spray. This extra layer will help prevent the apples from sticking and create that crispy bottom you’ll love.
Step 2: Prep the Apples for the Filling
Next up, let’s focus on the star of the show: the apples. For an apple crisp that truly shines, you’ll want a mix of sweet and tart apples for the perfect balance of flavors. Consider using a combination of Granny Smith and Fuji apples for a delightful contrast.
- Peel, core, and slice about 6 to 8 medium-sized apples.
- As you slice, toss the apple pieces in a bowl with some lemon juice to avoid browning.
Did you know that lemon juice not only preserves the apples’ color but also enhances their flavors? If you’re interested in learning more about apple varieties, this U.S. Apple Association page offers great insights into what to choose.
Step 3: Make the Apple Filling Mixture
Now, it’s time to bring the filling together. In the same bowl with your sliced apples, stir in:
- 1 cup of granulated sugar (adjust to taste)
- 1 teaspoon of ground cinnamon
- 1/4 teaspoon of nutmeg
- 2 tablespoons of all-purpose flour
This apple filling mixture not only sweetens and spices up the apples but the flour helps to thicken the juices you’ll find during baking. Mix everything until the apples are well-coated and ready for the skillet.
Step 4: Create the Crunchy Topping
A true apple crisp wouldn’t be complete without that irresistible crunchy topping. In a separate bowl, combine:
- 1 cup of rolled oats
- 1/2 cup of brown sugar
- 1/2 cup of all-purpose flour
- 1/2 teaspoon of ground cinnamon
- A pinch of salt
- 1/2 cup of melted butter (or coconut oil for a lighter touch)
Mix these ingredients until crumbly, and you’ll have the perfect topping that will bake into a beautiful golden brown. Feel free to throw in some chopped nuts or shredded coconut if you’re feeling adventurous!
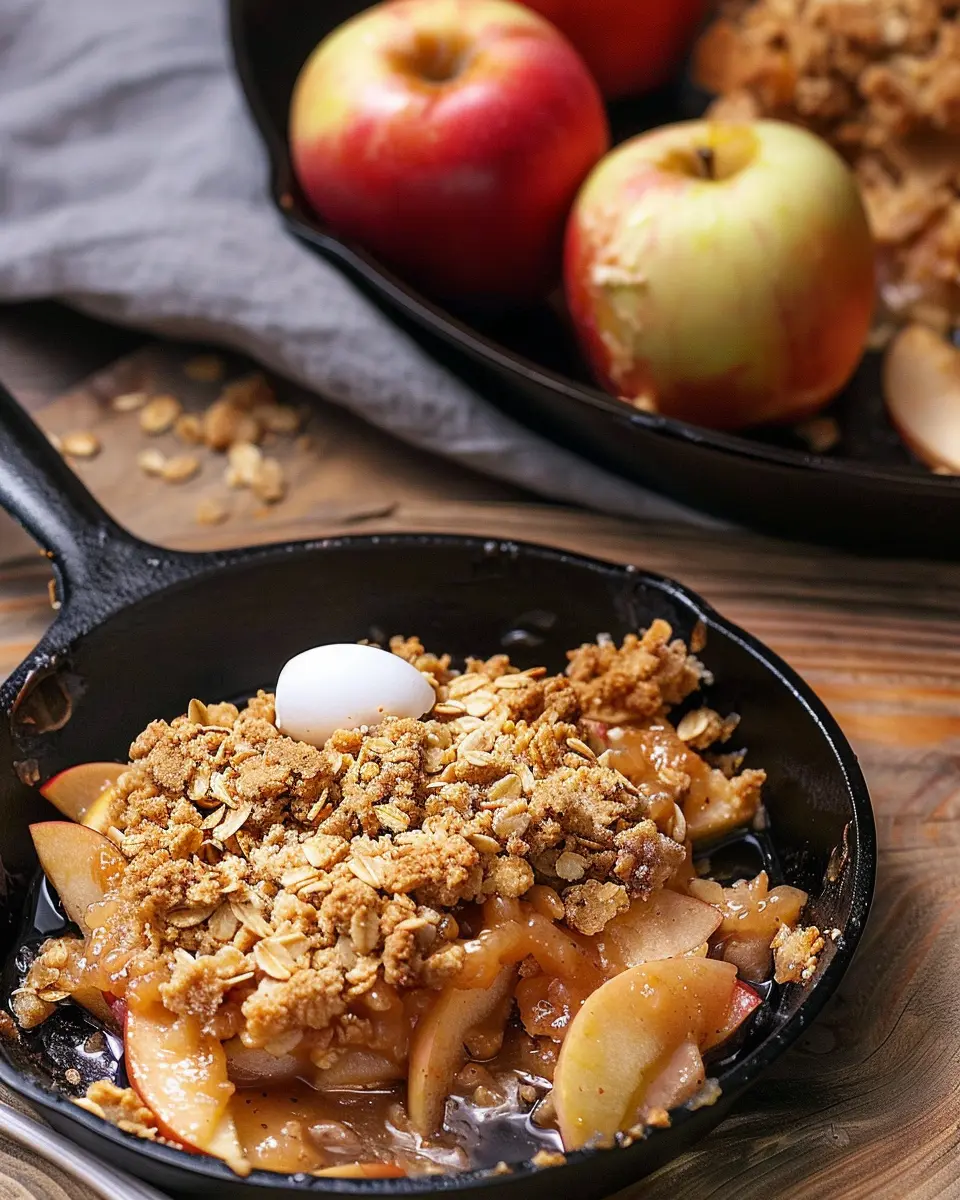
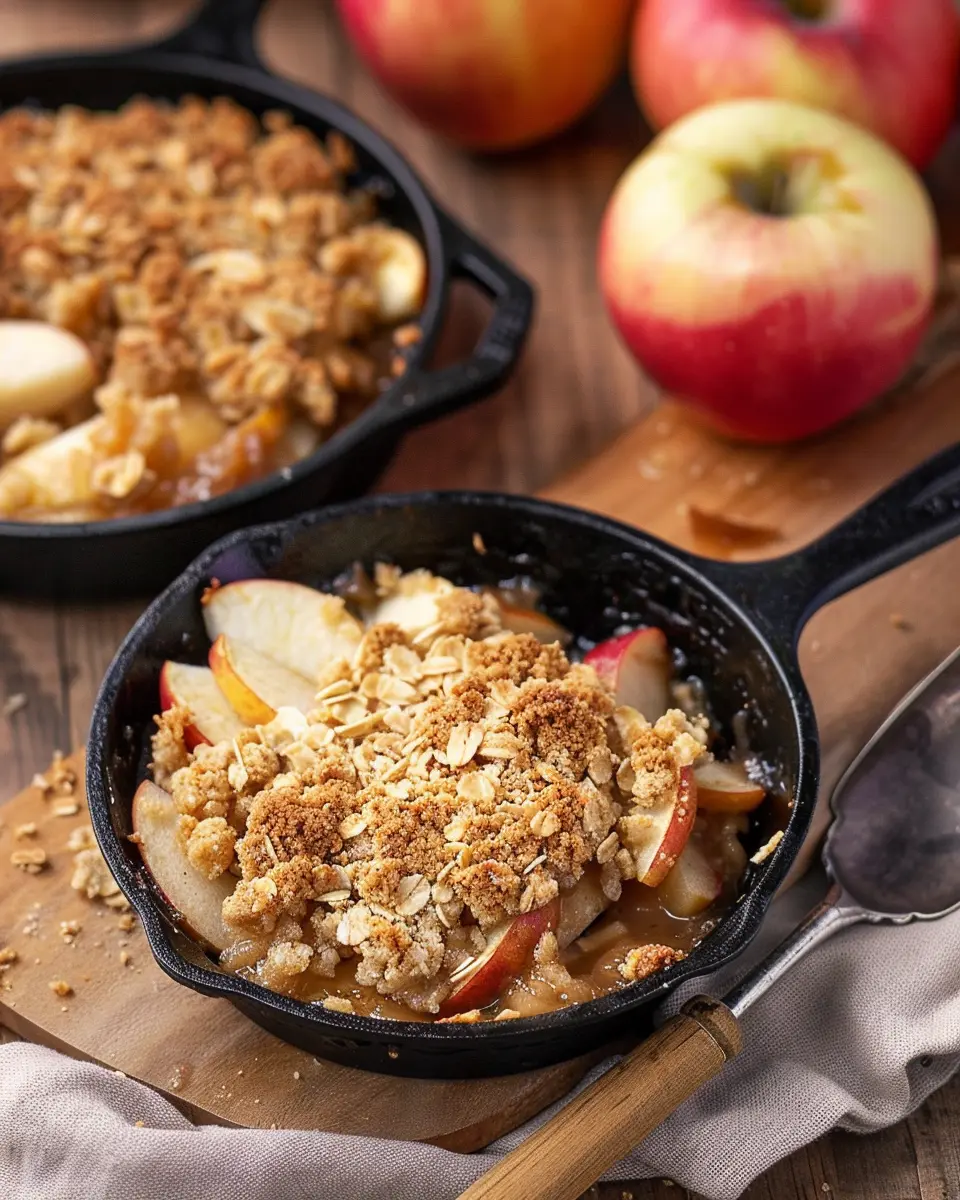
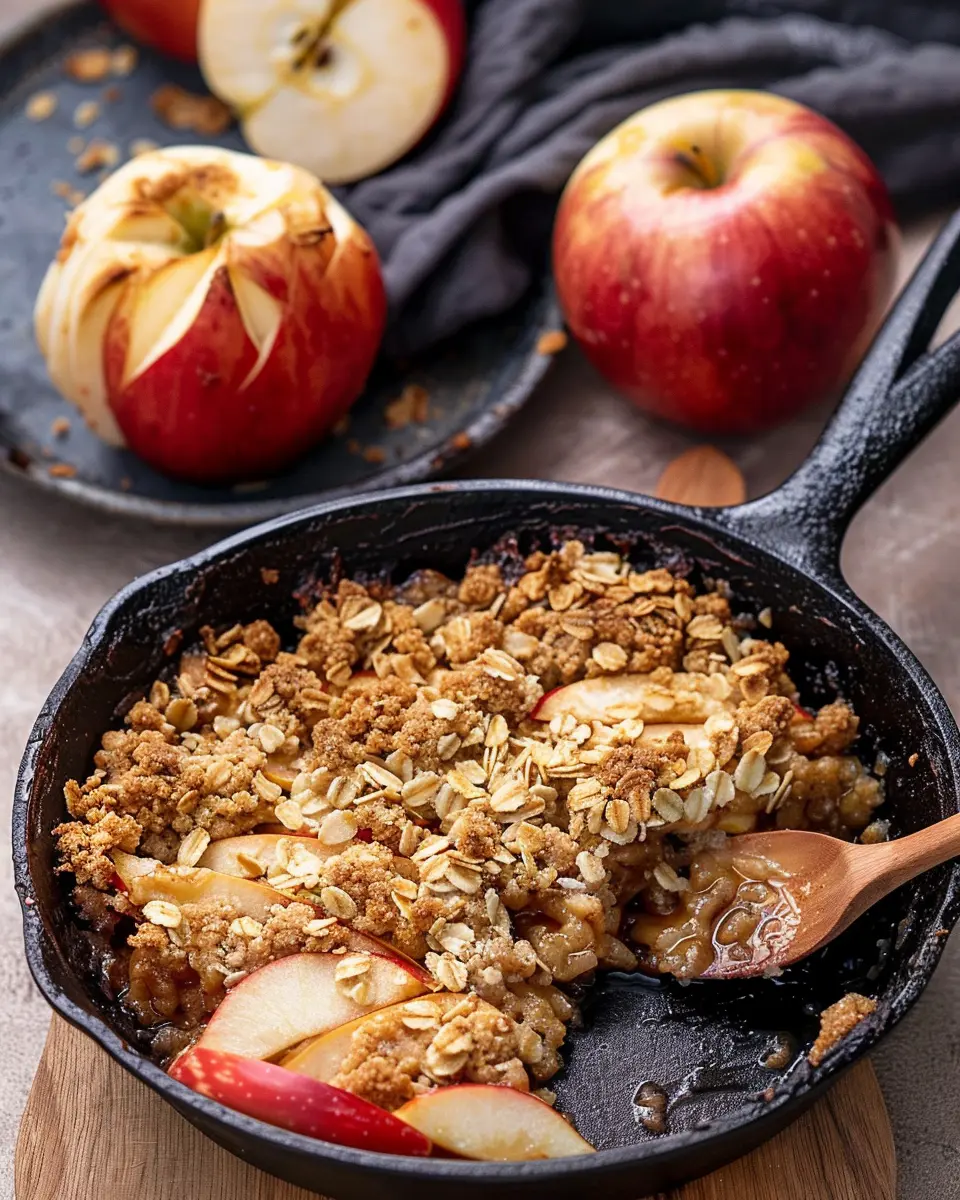
Step 5: Assemble and Bake the Apple Crisp
Now comes the fun part! Pour your apple filling into the prepared cast-iron skillet, spreading it evenly. Next, sprinkle the crunchy topping generously over the apples.
Slide your skillet into the preheated oven and bake for about 45 to 50 minutes, until the topping is golden and the apples are bubbling. The aroma wafting through your kitchen will make it impossible to resist peeking in!
Once it’s done, allow it to cool for a bit before serving. Pair your cast iron apple crisp with a scoop of vanilla ice cream, or simply enjoy it warm in all its glory.
Creating a cast iron apple crisp isn’t just about making dessert; it’s about crafting a moment of joy. So gather your friends or just cozy up with a bowl and savor every single bite! For more mouthwatering dessert ideas, check out The Kitchn for inspiration. Enjoy!
Variations on Cast Iron Apple Crisp
Gluten-free apple crisp alternative
If you’re looking for a gluten-free apple crisp, you’re in luck! Replacing traditional all-purpose flour with gluten-free oat flour, almond flour, or a gluten-free blend can keep this beloved dessert on your table. Simply swap out the flour in your topping for any of these options, and it won’t just be friendly to your tummy; it’ll still deliver that lovely, crunchy topping you crave. Plus, using rolled oats as part of your topping not only gives that coveted texture but also ensures you’re keeping it wholesome!
Don’t forget to check the labels on your oats to guarantee they’re certified gluten-free, as cross-contamination can be an issue for those with severe allergies.
Adding nuts or dried fruits for texture
Adding nuts or dried fruits to your cast iron apple crisp elevates the texture and flavor profile significantly. Chopped walnuts, pecans, or even hazelnuts can provide a lovely crunch, complementing the softness of the apples. If you want to get adventurous, toss in some dried cranberries or raisins. They’ll add a sweet bite that pairs beautifully with the tartness of the apples.
Consider this: a study from the Walnut Marketing Board suggests that incorporating nuts can boost heart health, making your dessert a little more than just an indulgence. So, not only are you making a delightful treat, but you’re also sneaking in some nutrition!
With these variations in mind, your cast iron apple crisp will not only be versatile but also a hit at gatherings. Enjoy experimenting and making this classic dish your own!
Cooking Tips and Notes for Cast Iron Apple Crisp
Choosing the Right Apples
When it comes to making a delicious cast iron apple crisp, apple selection is key. Opt for a mix of sweet and tart varieties to achieve a well-rounded flavor profile. Consider using:
- Granny Smith for tartness
- Honeycrisp for sweetness and texture
- Fuji for extra sweetness and crunch
This blend will provide a delightful contrast that enhances your dish and delights your taste buds. You can find various apple varieties at local farmers’ markets or grocery stores.
Adjusting Sweetness and Spices to Taste
Personal preference plays a huge role in the final flavor of your cast iron apple crisp. If you like it sweeter, don’t hesitate to add more sugar or even a drizzle of honey. On the spice front, feel free to customize:
- Add cinnamon or nutmeg for warmth.
- Incorporate a touch of ginger for a spicy kick.
Start with small amounts and adjust to your liking! Remember, it’s all about creating the perfect balance, so taste as you go. Happy cooking! For more tips, check out Serious Eats for culinary insights.
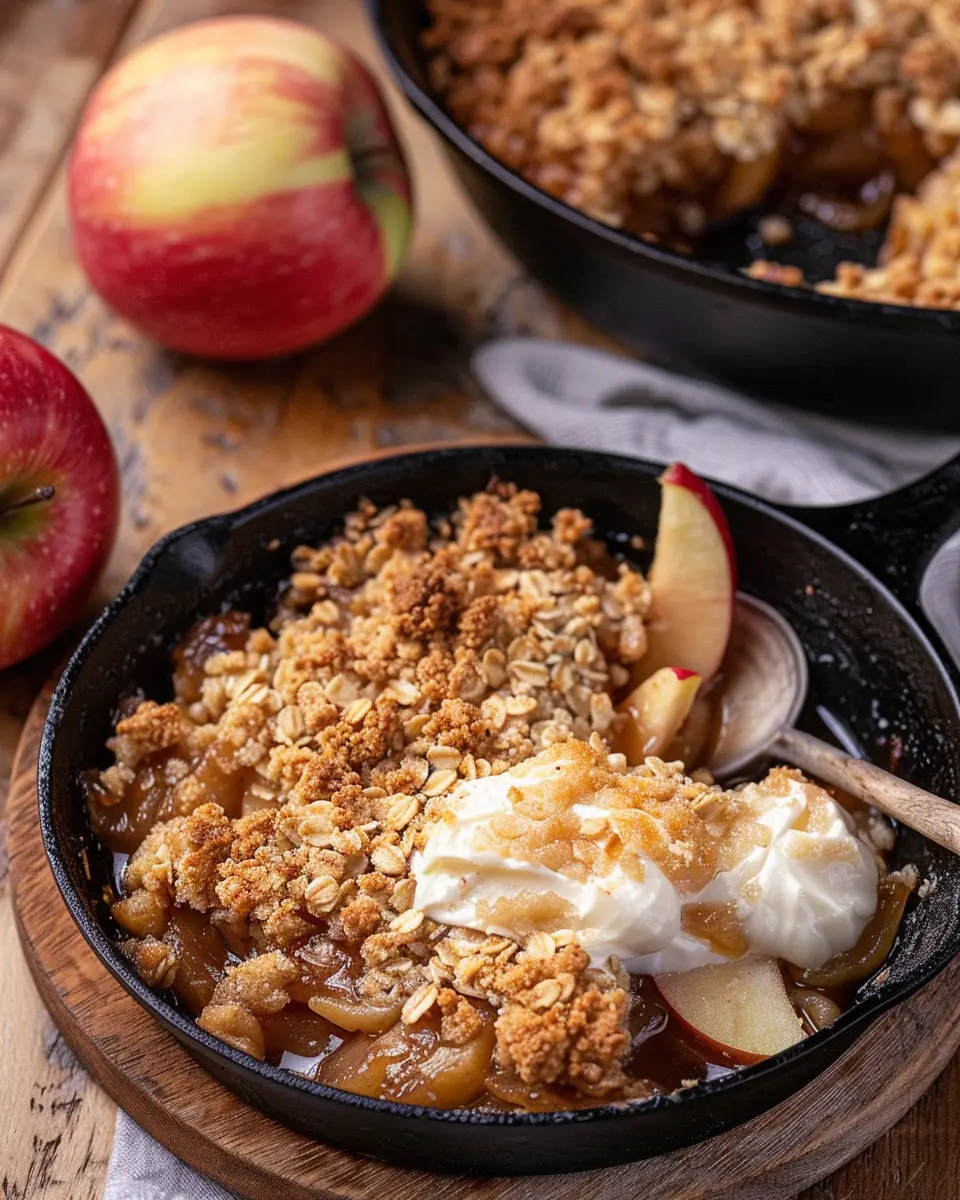
Serving Suggestions for Cast Iron Apple Crisp
Best toppings for an irresistible finish
Elevate your cast iron apple crisp with a few delightful toppings. Here are some suggestions to consider:
- Vanilla Ice Cream: The creamy texture of vanilla ice cream adds a delicious contrast to the warm, sweet crisp.
- Whipped Cream: Light and airy, a dollop of whipped cream offers a sweet finish without overpowering the dessert.
- Caramel Sauce: Drizzle some caramel over the top for a rich, indulgent touch that complements the apples perfectly.
- Nuts: Chopped walnuts or pecans not only add crunch but also a nutty flavor that pairs beautifully with the apple.
Perfect pairings for serving
Wondering what to serve alongside your cast iron apple crisp? A few options can enhance your dessert experience:
- Cider: A warm apple cider can be a cozy beverage choice, especially on a chilly evening.
- Herbal Tea: Try pairing it with a soothing herbal tea, like chamomile or peppermint, to balance the sweetness.
- Cheese: A mild cheese like Brie can help cut through the sweetness and add a savory note.
Pairing these options will create a memorable experience and impress your guests. For more ideas, check out this article on food pairings for inspiration!
Time Breakdown for Cast Iron Apple Crisp
Preparation Time
Preparing your cast iron apple crisp takes about 15-20 minutes. This is the perfect time to slice up your apples, mix the toppings, and get your kitchen organized. As you work, consider cranking up your favorite playlist or catching up on a podcast; the aroma of cinnamon and apples will surely elevate your mood.
Cooking Time
Once everything is in your trusty cast iron skillet, you’ll need about 30-35 minutes for baking. This is where the magic happens! Your apple crisp will bubble and turn golden brown, filling your kitchen with an irresistible scent that makes your mouth water.
Total Time
All in all, you’ll be looking at roughly an hour for this delightful dessert—from prep to the first sweet bite. With such a manageable time commitment, it’s a dish perfect for a weeknight treat or a cozy gathering. If you’re eager for more tips on perfecting your baking skills, check out resources like Epicurious. Enjoy your baking journey!
Nutritional Facts for Cast Iron Apple Crisp
Calories per serving
When you indulge in a serving of cast iron apple crisp, you’re looking at approximately 220 calories. This makes it a delicious yet manageable treat, perfect for satisfying your sweet tooth without derailing your health goals.
Key nutrients and their benefits
This mouth-watering dessert isn’t just about sweetness; it’s also packed with nutrients! Here’s what you’ll find:
- Fiber: Apples are a fantastic source of dietary fiber, promoting digestive health and keeping you feeling full longer.
- Vitamins: Rich in vitamins A and C, apples support your immune system and skin health.
- Antioxidants: Apples contain beneficial compounds like quercetin, which can help reduce inflammation and lower chronic disease risk.
Enjoying your cast iron apple crisp can be a delightful way to incorporate these nutrients into your diet. For more on the health benefits of apples, check out sources like Healthline.
Why it matters
When you whip up this delightful dessert, you’re not just treating yourself; you’re also enjoying a good dose of nutrition. So, go ahead, take that bite! It’s all about balance, right?
FAQs about Cast Iron Apple Crisp
Can I make this ahead of time?
Absolutely! One of the great things about cast iron apple crisp is that it lends itself well to make-ahead preparations. You can prepare the apple filling and crumble topping separately the day before and store them in your refrigerator. When you’re ready to bake, simply layer the filling in your cast iron skillet, top with the crumble, and pop it in the oven. This way, you’ll have a warm, delicious dessert ready to impress your friends and family with minimal effort!
What’s the best way to store leftovers?
Got leftovers? Don’t worry; it’s easy to store your cast iron apple crisp for later enjoyment! Allow it to cool completely and then cover the skillet with foil or transfer individual portions to an airtight container. It will keep well in the refrigerator for about 3 to 5 days. If you want to extend its life, you can freeze it for up to 3 months. When you’re ready for a cozy dessert, just reheat in the oven until warmed through.
Can I use other kinds of fruit?
Absolutely! While this cast iron apple crisp recipe calls for apples, feel free to get creative with your fruit choices. Berries, pears, or peaches work beautifully as alternatives. Just keep in mind that the ripeness and sweetness of the fruits can affect the overall flavor, so adjust the sugar accordingly. For more inspiration on pie fillings, check out this fruit crisp guide. Enjoy the versatility!
Conclusion on Cast Iron Apple Crisp
Celebrating homemade desserts with cast iron apple crisp
As we wrap up our delightful journey into the world of cast iron apple crisp, let’s take a moment to appreciate the magic of homemade desserts. There’s something special about gathering friends or family around a warm dish, filled with sweet, tender apples and a perfectly crisp topping. It’s not just about flavor; it’s about creating memories.
With this recipe, you’re not just following steps; you’re engaging in a tradition that spans generations. For a deeper dive into the art of baking, check out BBC Good Food for more inspiration. So, grab your cast iron skillet and a few fresh apples, and treat yourself—or share with a neighbor. Happiness is best when baked with love!
PrintCast Iron Apple Crisp: The Best Cozy Dessert for Fall Bliss

Indulge in the warmth of a cast iron apple crisp, the perfect dessert to celebrate the coziness of fall.
- Prep Time: 15 minutes
- Cook Time: 45 minutes
- Total Time: 1 hour
- Yield: 8 servings 1x
- Category: Dessert
- Method: Baking
- Cuisine: American
- Diet: Vegetarian
Ingredients
- 6 cups sliced apples
- 1 cup granulated sugar
- 1 teaspoon cinnamon
- 1/2 teaspoon nutmeg
- 1/2 cup all-purpose flour
- 1 cup rolled oats
- 1/2 cup brown sugar
- 1/2 cup unsalted butter, melted
Instructions
- Preheat your oven to 350°F (175°C).
- Toss the sliced apples with granulated sugar, cinnamon, and nutmeg in a large mixing bowl.
- In a separate bowl, combine flour, oats, brown sugar, and melted butter until crumbly.
- Spread the apple mixture in a cast iron skillet and top with the crumble mixture.
- Bake in the preheated oven for about 45 minutes or until the apples are tender and the topping is golden brown.
- Serve warm, optionally with ice cream.
Notes
- For an extra flavor twist, add some chopped nuts to the topping.
- Feel free to mix different types of apples for a more complex flavor.
Nutrition
- Serving Size: 1 serving
- Calories: 250
- Sugar: 20g
- Sodium: 200mg
- Fat: 12g
- Saturated Fat: 7g
- Unsaturated Fat: 3g
- Trans Fat: 0g
- Carbohydrates: 35g
- Fiber: 3g
- Protein: 2g
- Cholesterol: 20mg
Keywords: Cast Iron Apple Crisp, fall dessert, cozy dessert